There are few dessert combinations as universally beloved as chocolate and peanut butter. When you add in the satisfying crunch of crisp rice cereal, you get a dessert that’s not only irresistibly delicious but also incredibly easy to make. If you’re a fan of no-bake treats, you’re going to love these No-Bake Chocolate Peanut Butter Crunch Bars. They bring together the perfect balance of sweet, salty, creamy, and crunchy in one easy-to-make dessert bar that doesn’t require an oven, making it a go-to treat for any occasion.
Jump to RecipeWhether you need a quick dessert for a gathering or just want something to satisfy your sweet tooth, these bars are ideal. The combination of chocolate and peanut butter creates a rich, creamy flavor, while the rice cereal adds a light and crispy texture that perfectly complements the decadent filling. And the best part? This recipe only requires four simple ingredients, making it as quick to prepare as it is delicious.
In this comprehensive article, we’ll walk you through the step-by-step process of making these No-Bake Chocolate Peanut Butter Crunch Bars, offer tips for success, and explain why this recipe is a must-try for anyone who loves easy, no-bake desserts.
Why You’ll Love No-Bake Chocolate Peanut Butter Crunch Bars
There’s so much to love about these Chocolate Peanut Butter Crunch Bars—from their simplicity to their irresistible flavor. Here are a few reasons why they’ve become such a popular dessert option:
1. Easy to Make
This recipe is perfect for beginners or anyone looking for a quick dessert. With only four ingredients and no need for baking, the preparation is straightforward and hassle-free.
2. No Oven Required
If you don’t want to heat up your kitchen or don’t have access to an oven, this recipe is ideal. The bars are set in the freezer, making them perfect for hot summer days or when you’re short on time.
3. Sweet and Salty Flavor
The combination of sweet chocolate and salty peanut butter creates a mouthwatering flavor that appeals to both kids and adults alike. The addition of salt balances the sweetness and enhances the overall taste.
4. Versatile and Customizable
You can easily customize this recipe by adding other ingredients, such as nuts, dried fruit, or even marshmallows. The basic recipe is versatile enough to accommodate your personal preferences or whatever you have on hand in your pantry.
Step-by-Step Guide to Making No-Bake Chocolate Peanut Butter Crunch Bars
Let’s dive into the step-by-step process of creating these delicious Chocolate Peanut Butter Crunch Bars. The recipe is simple, but following these steps carefully will ensure that your bars turn out perfectly every time.
Ingredients
To get started, you’ll need just four basic ingredients:
- 1 ½ cups chocolate chips (semi-sweet or milk chocolate, depending on your preference)
- ½ cup peanut butter (creamy works best, but you can use chunky for added texture)
- ¼ teaspoon salt (to balance the sweetness and enhance the peanut butter flavor)
- 2 cups crisp rice cereal (such as Rice Krispies, for the crunchy texture)
These ingredients are pantry staples, so you may already have most of them on hand. If you’re using all-natural peanut butter, note that it will have a slightly different texture than processed peanut butter and may require additional refrigeration to set properly.
Instructions
1. Melt the Chocolate, Peanut Butter, and Salt
The first step is to melt the chocolate chips, peanut butter, and salt together. You can do this in one of two ways:
- Microwave method: Place the chocolate chips, peanut butter, and salt in a microwave-safe bowl. Heat the mixture in 30-second intervals, stirring between each session, until everything is smooth and melted.
- Double boiler method: Alternatively, you can use a double boiler. To do this, fill a small saucepan with about an inch of water and bring it to a boil. Place a heat-safe bowl on top of the saucepan (making sure the bottom of the bowl doesn’t touch the water), and add the chocolate chips, peanut butter, and salt. Stir the mixture continuously until it melts into a smooth consistency.
Using a double boiler is a gentler method that prevents the chocolate from scorching, but the microwave is faster and more convenient if you’re in a hurry.
2. Combine with Crisp Rice Cereal
Next, place the crisp rice cereal in a large mixing bowl. Pour the melted chocolate and peanut butter mixture over the cereal. Using a spatula or large spoon, stir the mixture until the cereal is evenly coated with the melted chocolate.
Be sure to mix thoroughly so that every piece of cereal is coated. This step ensures that the bars will have a consistent, crunchy texture throughout.
3. Prepare the Pan
For the next step, lightly grease a 9-by-5-inch loaf pan with a bit of butter or non-stick spray. This will help hold the parchment paper in place and prevent the bars from sticking to the sides of the pan.
Press a sheet of parchment paper into the bottom of the pan, making sure that it covers the entire base and comes up the sides. The parchment paper makes it much easier to lift the bars out of the pan once they’re set.
4. Transfer the Mixture to the Pan
Once the cereal and chocolate mixture is evenly combined, transfer it into the prepared loaf pan. Use a spatula or the back of a spoon to press the mixture firmly into the pan, smoothing the top so it’s even.
This step is important because pressing the mixture down ensures that the bars will hold together once they’re set. The more compact the mixture, the better the bars will slice.
5. Chill the Bars
Place the pan on a flat surface in the freezer and let the bars chill for about 1 hour, or until they’re firm to the touch. Freezing the bars helps them set quickly, but you can also let them chill in the refrigerator for a few hours if you prefer.
6. Slice and Serve
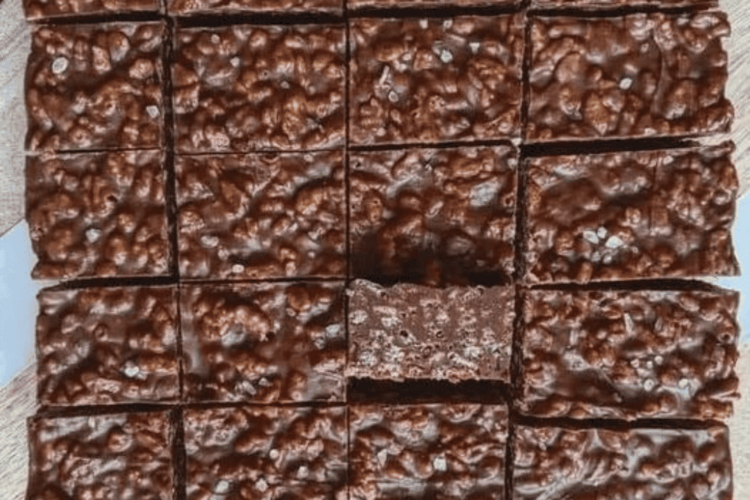
Once the bars are firm, remove the pan from the freezer. Use the parchment paper to lift the entire block of chocolate and peanut butter crunch out of the pan. Place it on a cutting board, and use a sharp knife to slice the block into 1-inch bars.
If you prefer smaller, bite-sized pieces, you can slice the bars down the center to create “fun-sized” treats. The size and shape of the bars are entirely up to you.
Tips for Perfect No-Bake Chocolate Peanut Butter Crunch Bars
While this recipe is simple, a few tips can help you achieve the best possible results:
1. Use High-Quality Chocolate Chips
The quality of your chocolate will directly impact the flavor of the bars. Choose good-quality chocolate chips for the best results. Semi-sweet chocolate chips are a great option because they strike a nice balance between sweetness and richness, but you can use milk chocolate if you prefer a sweeter bar.
2. Adjust the Peanut Butter to Your Liking
If you’re a big fan of peanut butter, feel free to add a bit more to the mixture. On the other hand, if you want a milder peanut butter flavor, you can reduce the amount slightly. Just be aware that the texture may change slightly depending on how much you use.
3. Customize the Recipe
One of the great things about these No-Bake Chocolate Peanut Butter Crunch Bars is how easy they are to customize. You can mix in additional ingredients to suit your preferences, such as:
- Chopped nuts (such as peanuts, almonds, or walnuts) for extra crunch
- Mini marshmallows for a s’mores-like flavor
- Shredded coconut for a tropical twist
- Dried fruit (such as raisins or cranberries) for a chewy texture
4. Store Properly
These bars can be stored in an airtight container in the refrigerator for up to two weeks. However, if you’re using all-natural peanut butter, keep in mind that the bars may soften when left at room temperature for too long. For longer storage, you can freeze the bars for up to three months.
5. Experiment with Chocolate
While semi-sweet or milk chocolate is most commonly used in this recipe, you can also try using dark chocolate for a more intense, slightly bitter flavor. White chocolate can also be an interesting variation for a sweeter, creamier twist.
Why No-Bake Chocolate Peanut Butter Crunch Bars Are Perfect for Any Occasion
These No-Bake Chocolate Peanut Butter Crunch Bars are more than just a dessert—they’re a versatile treat that’s perfect for a wide variety of occasions. Whether you’re looking for a quick snack, an after-dinner dessert, or a party treat, these bars are always a hit.
1. Great for Parties and Gatherings
These bars are easy to make in large batches, which makes them an ideal choice for parties, potlucks, or any other gathering where you need to feed a crowd. Plus, their bite-sized shape makes them easy to serve and eat without needing utensils.
2. Perfect for Kids
Kids love the combination of chocolate and peanut butter, and the crispy texture of the cereal adds an extra fun element. These bars are great for school lunches, after-school snacks, or as a special treat.
3. No Baking Required
No-bake desserts are a lifesaver when you’re short on time or don’t want to deal with the hassle of using an oven. These bars come together quickly and easily, making them a go-to recipe when you need a fast and delicious treat.

No-Bake Chocolate Peanut Butter Crunch Bars
These sweet and salty bars are packed with peanut butter, chocolate, and a crispy rice cereal. The perfect combination of flavors and textures will leave you craving more. Enjoy these special occasion treats for a satisfying snack.
Ingredients
1 1/2 cups chocolate chips
1/2 cup peanut butter
1/4 teaspoon salt
2 cups crisp rice cereal
Directions
- Melt the chocolate chips, peanut butter, and salt together. You can do this in a microwave, or in a double boiler by adding an inch of water to a small saucepan and placing a heat-safe bowl on top of the pot. Bring the water to a boil, and gently stir the chocolate chips, peanut butter, and salt together until they are smoothy melted.
- Place the rice cereal in a large bowl. Pour the melted chocolate mixture into the rice cereal and stir well, until evenly coated.
- Lightly grease a 9-by-5-inch loaf pan and press a piece of parchment paper into the bottom of the pan. (The oil will hold the parchment paper in place.) Transfer the crunch bar mixture into the pan, and smooth the top with a spatula. Place the pan on a flat surface in the freezer to chill until firm, about 1 hour.
- When the chocolate feels firm to the touch, you can use the parchment paper to lift the bars out of the pan. Use a sharp knife to slice the chocolate into 1-inch bars. You can make "fun size" bars by slicing the chocolate down the center, as well. (See photos for reference.)
- These crunch bars are best kept in an airtight container in the fridge, for up to 2 weeks. When you use an all-natural peanut butter, they will become softer when left at room temperature for too long. You can also freeze these for up to 3 months, if you'd like to store them longer.
You might also enjoy this delicious dish!
Healthy Cookies – No Sugar, No Flour!
Decadent German Chocolate Pecan Pound Cake Delight
Pumpkin Chocolate Chip Cookies
Classic New Orleans Bread Pudding
Conclusion: A Must-Try Recipe for Chocolate and Peanut Butter Lovers
If you’re a fan of the classic combination of chocolate and peanut butter, you need to try these No-Bake Chocolate Peanut Butter Crunch Bars. They offer a perfect balance of sweet, salty, creamy, and crunchy in every bite. With only four simple ingredients and no baking required, they’re easy enough for anyone to make.
These bars are perfect for any occasion, whether you’re looking for a quick snack or a dessert to share with friends and family. Plus, they’re highly customizable, so you can make them your own by adding your favorite mix-ins.
Give this recipe a try, and you’ll see why it’s a favorite among dessert lovers everywhere!